If a tile breaks as a result of the fall of a heavy object or deteriorates too clearly, the floor may be damaged and even leakage problems may arise. It is time to replace a broken tile. This article highlights the importance of storing spare tiles when installing a tile or ceramic floor and explains how to carefully remove the broken tile, place the new tile and give the work a good finish.
Whenever installed floor or ceramic tile, should keep some spare tiles. In this way, if at any moment it breaks or deteriorates too much and it is necessary to change it, it will be possible to place another one of the same design, without running the risk of not getting an equal one.
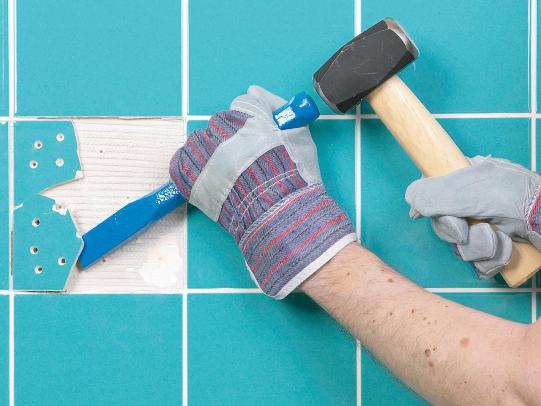
Carefully remove broken tiles
Replacing broken or worn-out tiles is a fairly simple task. The first part of the job is to remove the damaged tile. This task must be done with great care, because although it does not matter if the tile to be removed is broken even more, it is important to avoid breaking the surrounding ones. And if precautions are not taken, that can happen.
As a first step, the cement that is in the joints of the tiles, which constitutes the so-called grout, must be removed. To do this, you can use a specific tool, called a grout scraper (similar to a cutter but larger), but a spatula is also worth doing.
Both for this first step and for all subsequent ones, the use of gloves and safety glasses is recommended, to avoid possible accidents.
Once the cement has been removed, the tile should be broken. This can be used with an endless (circular) saw. The best way is to make two slots that follow the diagonals of the tile. That is to say, as if drawing an X on it. Then it is given with a punch and a hammer in the center, to loosen the four parts in which the tile has been divided and then removed with the aid of a chisel.
If you do not have a saw, you can do all this work with a chisel and a hammer. This way, you have to be more careful not to break the surrounding tiles. The task takes more time, but also allows achieving an optimal result.
After removing the old tile, it must also be removed, with the help of the same chisel used before, all the remains of cement or glue that remain in the hole. Once this is done, the space will be ready for the second part of the work: place the new tile.
Placement of the new tile
To adhere the tile to the floor; cement or other specific glue must be used for this type of material. After wetting both the hole in the floor and the back of the new piece, apply a thin layer of cement on both surfaces. The most appropriate method to do this is with a square-notch trowel, which allows to spread the glue very well.
The tile is then placed in its place. It must be pressed with sufficient force to ensure that it is at the same level as the ones around. For this, it is very useful a rubber mallet with which to give slight blows on the tile. In the absence of a rubber mallet, a hammer and a wooden board can be used, so as not to directly hit the ceramic, which could be damaged.
It is likely that part of the cement will escape through the joints, so all that leftover should be removed. If, despite the force exerted on the tile, it is not possible to lower it to the level of the others, there is likely to be excess cement. In this case, remove it, remove the excess cement or glue and replace it.
The use of crosspieces or very small wooden wedges, placed between the new tile and the surrounding tile, can also be very helpful to ensure that pressing and tapping on it will not be in the wrong position (closer to ones than others, that is, misaligned).
Finishing work
To apply the grout, wait at least 24 hours, in order to allow time for the cement to dry. The grout expands on all the tiles, both on the new and the old ones around. It is important to allow it to dry for a quarter of an hour, and then clean the tiles with an abrasive scourer enough to remove the cement but without damaging the material of the pieces.
One last tip: place something on the newly placed tile, such as a bucket or other container, to keep someone unaware from passing by, step on the tile and ruin the job. This way, the ground will be ready and, although in the first days the new piece can stand out over the rest, due to its minor wear, the normal thing is that, unless it is a zone that walks little, soon cease to attract attention.
Related Posts
Types of floating platforms: Advantages and disadvantages
The appearance of floating flooring in the floor market in…

How to use the air conditioning in winter?
To not suffer from the cold of winter and spend…

How to remove ice from the freezer without unplugging
One of the most overlooked tasks in homes is cleaning…